2.Design, develop, and implement the architecture and infrastructure needed to support a complete game project.
Pirate Invasion
-
Title screen in which we put a background image from our designer.
-
Our artist created the two characters and I put them to introduce the characters that we will be using.
-
Pirate Invasion made with GameMaker Studio.
-
Multiplayer survival game
-
Made with the help of my team from the Game put everything together in order to create our first game ever.


-
After putting the background we started with the battlefield area.
-
The artist drew both battlegrounds for each character's side.
-
Also, she created the characters and their weapons.
-
After I received the assets I had to put on in each square for the background to look like this.
-
After finishing this I added the characters and their weapons in front of them as the player will know what they were going to use as a fire weapon.
-
This is the how-to-play screen.
-
Here we show the players how to move and shoot.
-
This screen was made using GameMaker sprite editor for the letters.
-
After adding the instructions we just show off our characters and a back button so that our players can go back to the menu.


-
This is our credits screen.
-
Thanking everyone who made this project possible.
-
Thanks to our artist who made our credits background, I implemented it and added a back button to get back to the menu.
-
One of our two winning screens.
-
Here we made our background all black and used the sprite editor to let the players know who won.
-
Adding another more art from our artist who modifies the loser's face with huge x in their eyes.
-
Last adding a back button to the menu.


-
This will be our other game-winning screen where Llab the pirate wins.
-
We use the sprite editor for each sprite that we used in order to make them look good for the game.
-
Our artist passed us the png and I had to move the to the sprite editor to edit the sprite for it not to be so big in the game.
-
Then after that, we would have to create a game object for each sprite used.
-
So not only did we have a sprite for characters but we also had sprites for the weapons and the bullets used for each weapon.


-
This is where we all have all of the materials needed for our game to be completed.
-
Everything was in order and had their own separate folders thanks to GameMaker.
-
We not only used sprites and game objects, but we also had to create each background and room in order to put everything together in the room option.
-
Also, we added some sound that you can hear as background music, victory music, and sound effects for when the player shoots their weapon.
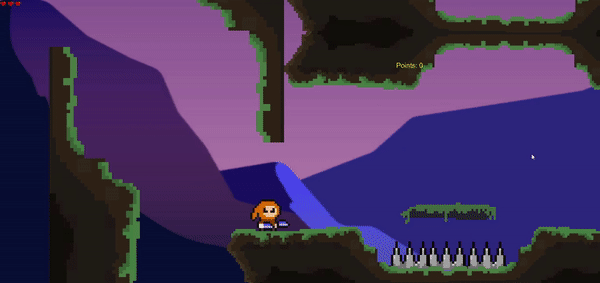
Young Knife Boy

-
Platformer made in Unity.
-
Made some new stuff such as collecting coins and moving platforms.
-
Also added a little bit more difficulty to it.
-
In this gif, as you can see I made the character be able to jump and stick to walls to go through secret places.
-
When playing the game shoot for a high score where there are more secret places with coins to get!

-
This is how the title page looks while adding a canvas in order to put the background and adding the buttons to start the game or quit.
-
On the left side, you can see all the assets used in order for level 1 to be playable.
-
All the green highlighted areas are all the platforms for this level and their colliders in order for the character to move around the level.
-
Also on the left side, there is the pause menu with an option to resume the game, restart the level go to the main menu, or quit the game.


-
On this, as you see on the left side there are more assets used for this level to be made.
-
There are more assets as I inputted more moving platforms in order to make the level challenges.
-
Also if you can see those are all the prefabs in order to make more levels which contains prefabs for the main character, enemies, platforms, and even the canvas used.
-
This is the Victory screen when getting over all four levels.
-
I used the same as the main menu, used canvas, and a button that lets you back to the main menu.
-
Also on the right as you can see I use an audio source to let the player have a notice when they won.
-
These audio sources are used in every scene as background music according to the scene.


-
This is the game over screen, the same as the other screens it has the same items.
-
Also adding the main menu button and sad audio to let the player they have reached a game over.